Editing Videos
Right-Click Features
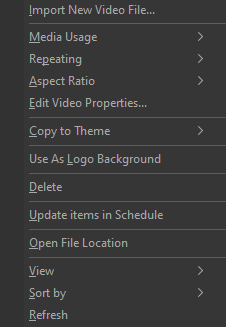
When right-clicking a thumbnail in the Videos Resource Library, you have the following options.
|
Import New Video File... |
This is a shortcut for adding additional videos. |
|
Media Usage |
Set the usage of the video whether you'll use it as a background, foreground, or use Automatic. |
|
Repeating |
Set whether you want the video to always repeat or not to repeat, or use Automatic. |
|
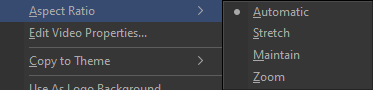
Aspect Ratio |
Set the aspect ratio of the video whether you want it to stretch, maintain, or zoom in, or use Automatic. |
|
Edit Video Properties... |
Opens the Video Properties Editor. |
|
Copy to Theme > |
Select Song Theme, Scripture Theme, or Presentation Theme to add the video to the desired theme library. |
|
Set as Logo Background |
Sets the video as the default background logo. Clicking the Logo button in the Toolbar will output the logo you selected to the screen. Clicking it again turns off the logo. |
|
Delete |
Deletes the video from the Resource Area. It will prompt you to delete it completely from the / Resources / Videos folder. |
|
Update items in Schedule |
Allows you to update the same item in the schedule if you make edits in the database. |
|
Open File Location |
Open the File Explorer window where that video file is located on the computer. |
|
View > |
Allows you to change icon size for a custom thumbnail view. |
|
Sort by > |
The same as in Windows. |
|
Refresh |
This will refresh the thumbnails for the selected item. |


Video Properties Editor
Follow these steps to edit the properties of any video in EasyWorship:
- Click the Media tab in the Resource Area.
- Select Videos from the Resource Area on the left.
- Right-click the video you want to edit and select the option to Edit Video Properties.
- The Video Properties editor will appear, allowing you to customize properties of the video such as volume, aspect ratio, Mark In and Mark Out points, etc.
Properties Tab
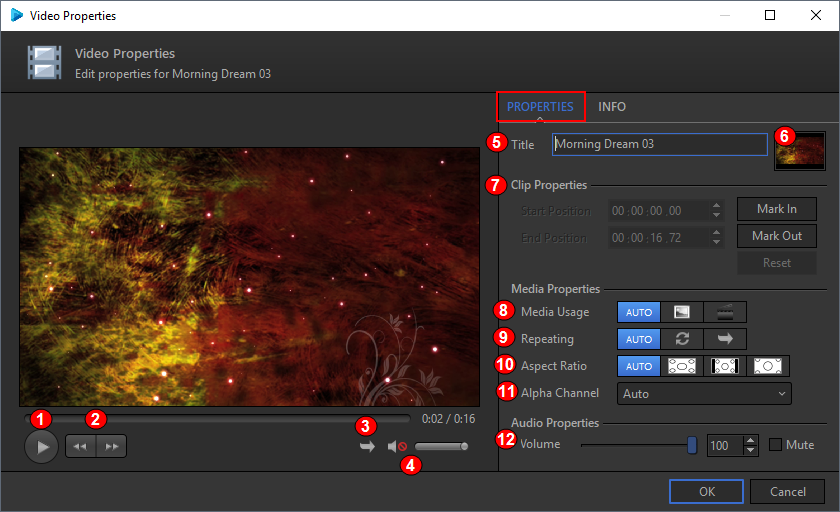
- Play / Pause: The Play / Pause button starts and stops the video playback.
- Fast-Forward / Rewind: Single clicking skips forward or backward one chapter. Holding the FFW or RWD buttons down will fast forward or rewind the video.
- Continuous Play / Repeat: button allows you to loop the video you are viewing or let it stop at the end of the clip.
- Mute & Volume: button and volume slider only controls the audio while working with the video in this properties window. The audio will not be muted on playback.
- Title: Displays the name of the video in this field. (The title can be edited here)
- Thumbnail: Click the thumbnail box on the right to set the thumbnail. (This takes a snapshot of what is currently in the player window.)
- Clip Properties:
- Start Position is the time at which the video will start. Use the up and down arrows to manually adjust the time.
- Mark In sets the start position of the video. Click this button as the video plays to set the start position.
- End Position is the time at which the video will end. Use the up and down arrows to manually adjust the time.
- Mark Out sets the end position. Click this button as the video plays to set the end position.
- Reset simply resets the Start and End Points back to the default. i.e. the original beginning and end of the video.
- Media Usage changes how the background image behaves.
- Selecting the Picture icon
 stretches the image to fill the screen and loops.
 - Selecting the Movie icon
 does not stretch the video or image and does not loop if the background is a video.
- The Repeating selector determines how a video will behave.
- Selecting the Repeating On icon
 will loop the video until you stop it or until you go live to something else.
 - Selecting the Repeating Off icon
 will play the video to the end and stop.
- Aspect Ratio: Allows you to maintain the aspect ratio, stretch or zoom the video.
- Selecting the Stretch icon
 will stretch the video to fit the screen.
 - Selecting the Maintain icon
 will keep the video at the original aspect ratio.
 - Selecting the Zoom icon
 will zoom the video to fit the screen but will not distort the image.
- Alpha Channel: If you're using an alpha channel video, you can select whether it's a Top-to-Bottom or Side-by-Side video.
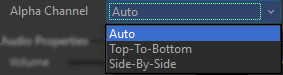
- Select Auto for pro-res videos with transparency.
- Select Top-To-Bottom when using a video with fill and mask on a vertical placement.
- Select Side-By-Side when using a video with fill and mask on a horizontal placement.
- Audio Properties: Allows you to change the volume of the video when you go live with it. The volume slider allows you to set the volume of the video for playback to the audience. Mute allows you to mute the audio on the video if you don’t wish to use the audio portion of the video.
Info Tab
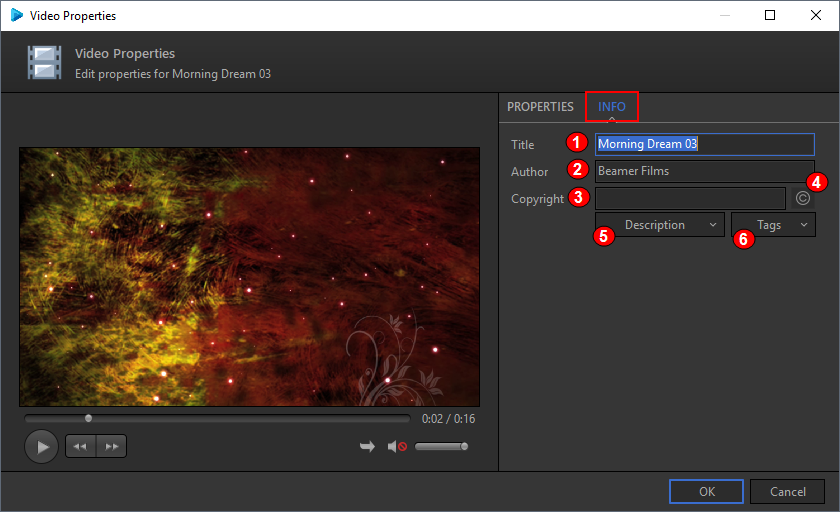
- Title: Enter the name of the video in this field.
- Author: Enter the Author in this field.
- Copyright: Enter copyright info in this field.
- © Button: Pressing the copyright logo button adds the copyright logo to the copyright field.
- Description: This drop down allows you to enter a description for the video.
- Tags: This drop-down allows you to enter tags for the video.
Click OK When you're finished editing to save your changes.